

8 Best Ways to Fix Chat for Microsoft Teams Not Working on Windows 11
Chat For Microsoft Teams arrived as a Skype alternative for connecting with your contacts. You can send messages, use Emoji Reactions, and connect using video calls. The Chat icon is available in the Taskbar of your Windows 11 computer to start using the app.
But some users have complained they can’t use the Chat app on their computers. So if you are also facing such issues, we bring the best solutions to fix Chat for Microsoft Teams not working on Windows 11.
1. Check Your Internet Connection
The first troubleshooting method is to check your internet connection simply. Connect your Windows 11 computer to a 5GHz frequency band and run a speed test. This will ensure that your Internet Service Provider is not facing any downtime.
2. Restart Chat for Microsoft Teams App
The next basic solution is to restart the app on your Windows 11 computer. This will give the app a fresh start and help solve the issue.
Step 1: Click the Arrow icon at the bottom-right corner of the Taskbar.
![]()
Step 2: Right-click on the Microsoft Teams icon and select Quit.
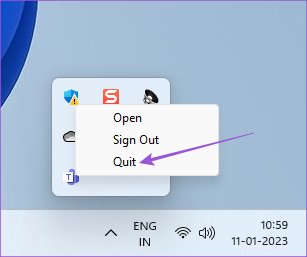
Step 3: Once done, click the Chat icon again in the middle of the Taskbar to relaunch the app.
3. Login Again to Your Microsoft Account
If relaunching the app did not work, you can sign out and log in again to your Microsoft account. This will download all chats again in the Chat for Microsoft Teams app.
Step 1: Click the Arrow icon at the bottom-right corner of the Taskbar.
![]()
Step 2: Right-click on the Microsoft Teams icon and select Sign Out.
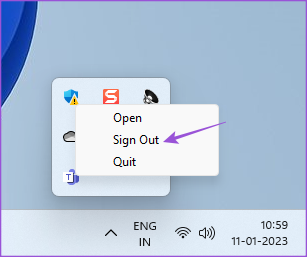
Step 3: Click on Sign Out again to confirm your choice.

Step 4: Under Pick An Account, select your Microsoft email address to log in again.

Step 5: Try launching the Chat app to check if the problem is solved.
4. Repair and Reset the Chat App
Windows 11 allows you to Repair and Reset installed apps on your computer to solve various issues, including this one. Do note that Resetting the app will delete all its data, and you will have to sign in again to your account. Here’s how.
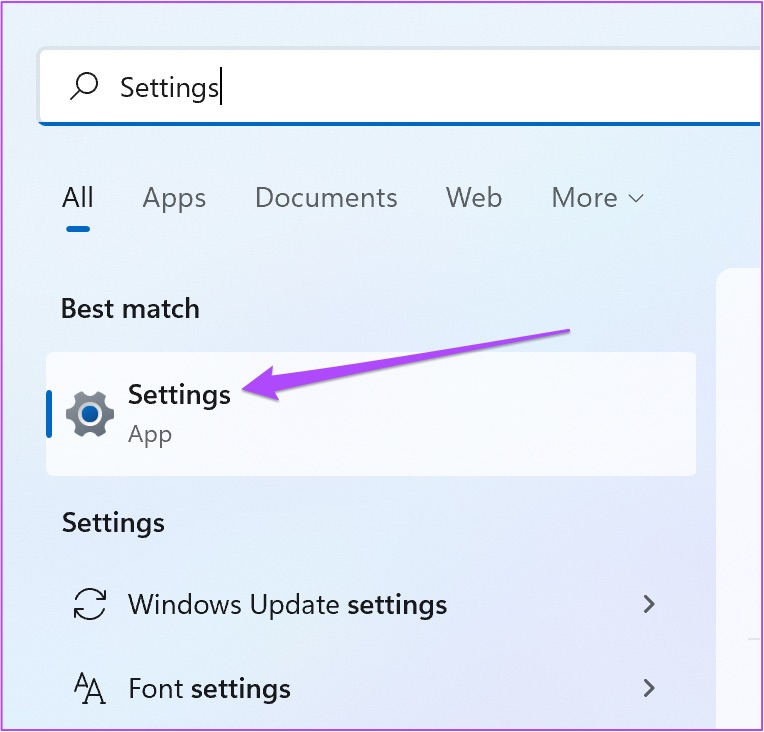
Step 1: Click the Start icon on your Windows 11 computer, type Settings, and press Enter.
Step 2: Click on Apps from the left menu.
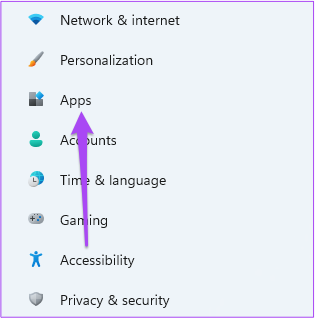
Step 3: Click on Installed Apps.
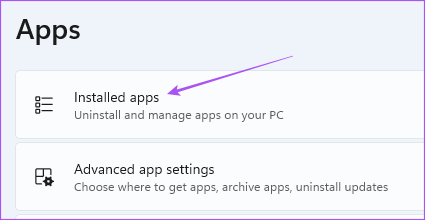
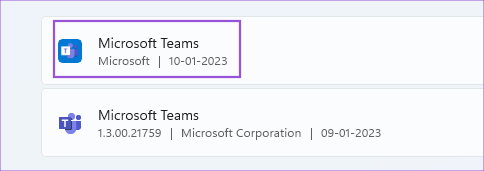
Step 4: Search for Microsoft Teams.
Do note that the logo of Chat from Microsoft Teams is different from Microsoft Teams for Enterprise. The Chat for Microsoft Teams logo will not have a white T written on it.
Step 5: Click the three dots on the right side of the logo and select Advanced Options.
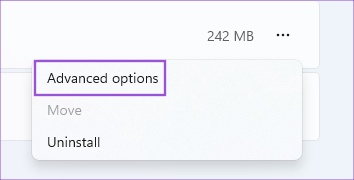
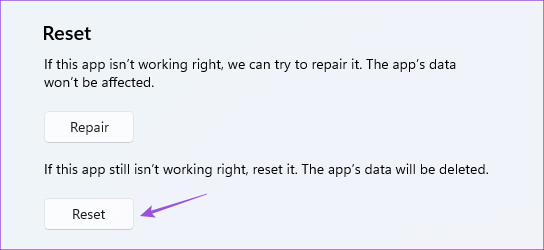
Step 6: Scroll down and click on Repair. Then follow the on-screen process.
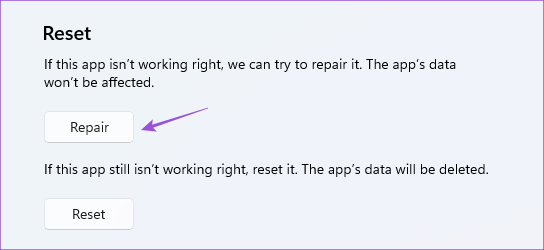
Step 7: If the app still doesn’t work properly, you can click on Reset.
Step 8: After that, close the window and check if the problem is solved.
5. Check if the App Is Blocked by Windows Firewall
Windows Defender Firewall is a built-in security feature that limits or permits programs and apps to make outgoing connections. So if the Chat for Microsoft Teams app is still not working on your Windows 11 computer, you can check if Firewall has blocked it.
Step 1: Click the Start icon on your Windows 11 computer, type Firewall and Network Protection, and press Enter.

Step 2: Click on Allow An App Through Firewall.

Step 3: Click on Change Settings.
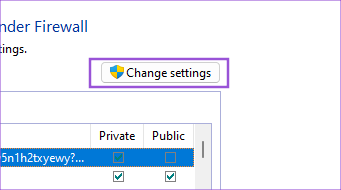
Step 4: Scroll down and click the check boxes next to Teams.exe.

Step 5: Click on Ok at the bottom to confirm.

Step 6: Close the window and open the Chat app to check if the problem is solved.
You can also read about a few more ways to reset Firewall settings on Windows 11.
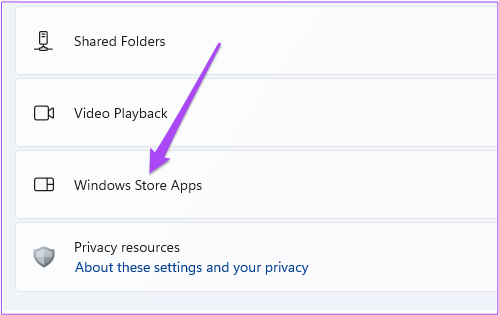
6. Run Windows Store App Troubleshooter
If the above solution does not work, you can run the Windows Store App Troubleshooter to let your computer examine and fix the issue automatically. Note that Windows 11 Insider Build 25169 or higher will show Microsoft Store app troubleshooter as Windows Store Apps.
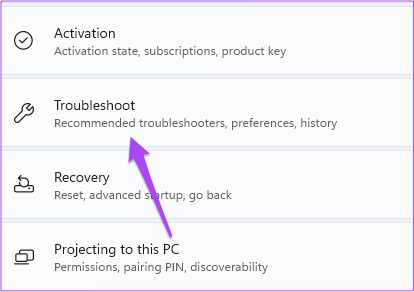
Step 1: Click the Start icon on your Windows 11 computer, type Settings, and press Enter.
Step 2: Under System Settings, scroll down and click on Troubleshoot.
Step 3: Click on Other Troubleshooters.

Step 4: Scroll down and click on Run next to Windows Store Apps.
Step 5: Follow the on-screen instructions to finish the troubleshooting process.
Step 6: After the process completes, open the Chat app to check if the problem is solved.
7. Delete Teams App Cache
The App Cache stores all your preferences and login information on your Windows 11 computer. You can delete the App Cache for Microsoft Teams by following these steps.
Step 1: Press Windows + R to open the Run window.
Step 2: Type {5376dfc28cf0a7990a1dde1ec4d231557d3d9e6448247a9e5e61bb9e48b1de73}AppData{5376dfc28cf0a7990a1dde1ec4d231557d3d9e6448247a9e5e61bb9e48b1de73}MicrosoftTeams and press Enter.
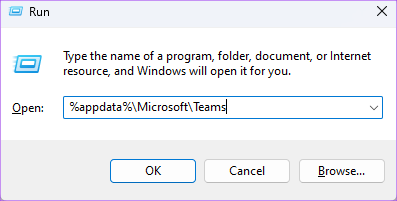
Step 3: Select all the contents and press Delete.
Step 4: Close the window and restart your computer.
Step 5: Open the Chat app again and check if the problem is solved.
8. Update Windows 11
The last option for you to try is updating the version of Windows 11 on your computer. This will remove the bugs preventing the Chat for Microsoft Teams app from functioning properly.
Step 1: Click the Start icon on your Windows 11 computer, type Settings, and press Enter.
Step 2: Click on Windows Update at the top-right corner.

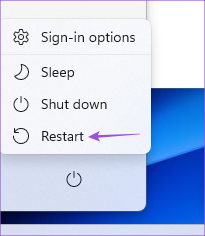
Step 3: If an update is available, download and install it.
Step 4: Click on Restart to install the updates.

Step 5: Once done, check if the problem is solved.
Connect With Loved Ones
The Chat for Microsoft Teams app was introduced in Windows 11 to get in touch with your personal contacts only. You can also read our post if Microsoft Teams Reactions are not working on Windows 11.