

How to Fix Windows Update Error 0x80070426
Windows Update is a vital service that lets you regularly download and install the latest updates. But that doesn’t mean such updates are always beneficial; sometimes they can cause issues in Windows and result in an error message. One such error code is 0x80070426 which occurs when you try to install some updates on your system.
A short note describes some installation problems but doesn’t give you much information on how to resolve them. This guide gives you a list of possible solutions to help fix the problem.
What Causes Windows Update Error 0x80070426?
There are many reasons why Windows Update Error 0x80070426 occurs, but the root cause is corrupted and faulty system files. Windows 10 can also have this problem if you upgrade it from an older version of the OS. This error can also prevent Microsoft Defender and the Microsoft Store from launching.
It usually comes with a brief note stating, “There were some problems installing updates, but we’ll try again later. If you keep seeing this and want to search the web or contact support for information, this may help: (0x80070426).”
Here are the steps to try when you see this error.
1. Restart the Computer and Try Again
Most users find that restarting their computer helps them resolve Windows Update errors. So, before trying other solutions, restart your computer and check if that resolves the problem.
2. Run the Windows Update Troubleshooter
Windows comes with a built-in troubleshooter tool that can help you identify the problem preventing Windows Updates. The tool may not fix all update issues; however, it can solve many errors. So, give it a shot with these steps:
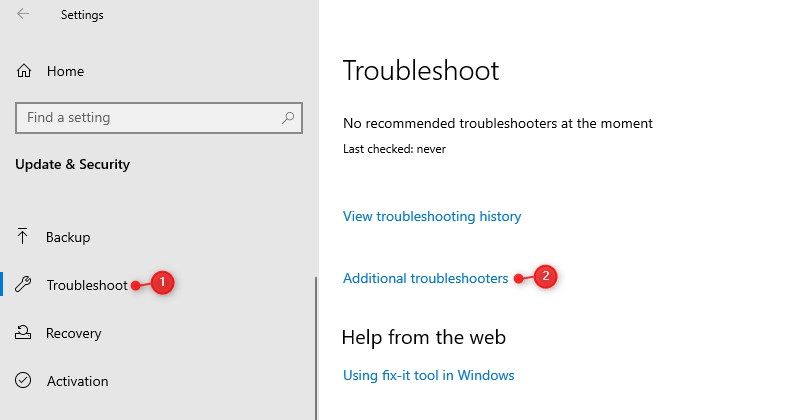
- Right-click on the Start button and select the Settings option.
- Select the Update & Security category from the Settings menu.
- From the left navigation bar, choose Troubleshoot.
- Next, click on Additional troubleshooter on the right side of the screen.
5. Scroll down and select Windows Update on the next page. 6. Click on the Run the troubleshooter option. The troubleshooting takes some time to complete, so please don’t worry if it runs late. Furthermore, the troubleshooter may not be able to fix the problem automatically. You will, however, receive some additional instructions, so make sure you follow them.

After performing the above steps, check to see if Windows now allows you to install updates.
There are several possible causes for this error code, but the most common one is a temporary malfunction or a corrupted system file. In such a case, you will need to use a built-in tool called System File Checker to scan and repair the corrupted files. The procedure to run this tool is as follows:
- Run the Command Prompt as an administrator.
- Copy and paste the below command and press Enter:
sfc /scannowIt will take a while for the process to complete. You can perform other tasks while the system scans the data for missing or corrupt system files if you wish. After it completes the process, restart your computer and try updating Windows again.
If the problem continues, you must run the DISM scan to repair any corrupted system images and restore the system files. Follow these steps:
- Open the Command Prompt.
- Type the below command in the command prompt window and press Enter:
Dism.exe /online /cleanup-image /scanhealth
Dism.exe /online /cleanup-image /restorehealth
The process may take a while to complete. Once you have executed the DISM command, restart your computer and check if that fixes the error. Then, proceed to the next step if you’re still experiencing the problem.
4. Restart Some Important Windows Services
This solution requires you to restart certain crucial Windows Update services that are not functioning. The steps are as follows:
- Right-click on the Start menu and select Run from the menu list.
- Type services.msc in the dialog box and click the OK button.
- In the Services window, scroll down to the Windows Update service.
- Once you find it, double-click on it to open the Properties window.
- When the Properties window opens, set the Startup type to Automatic.
- Under Service status, click Start.
- Click Apply then OK to save the changes.
Once you have completed the above steps, repeat the process with some other services that are present on your computer:
- Background Intelligent Transfer Service.
- Cryptographic Service.
- Windows Update Medic Service.
- Cryptographic Services
- DCOM Server Process Launcher
- RPC Endpoint Mapper
- Windows Installer
5. Reset Windows Update Components to Default
Corrupted Windows Update components can often cause update errors. To resolve this issue, you must reset all Windows update components and retry updating Windows.
net stop bits
net stop wuauserv
net stop appidsvc
net stop cryptsvc- Press the Windows + R keys to open the Run dialog box.
- Type cmd in the text box and press the Ctrl + Shift + Enter key. This will open Command Prompt with admin rights.
- In the Command Prompt window, type the following command and press Enter after each one:
- Next, type the following command and hit Enter to rename the SoftwareDistribution folder:
Ren {5376dfc28cf0a7990a1dde1ec4d231557d3d9e6448247a9e5e61bb9e48b1de73}systemroot{5376dfc28cf0a7990a1dde1ec4d231557d3d9e6448247a9e5e61bb9e48b1de73}SoftwareDistribution SoftwareDistribution.old - Now you need to run the following command to rename the catroot2 folder:
Ren {5376dfc28cf0a7990a1dde1ec4d231557d3d9e6448247a9e5e61bb9e48b1de73}systemroot{5376dfc28cf0a7990a1dde1ec4d231557d3d9e6448247a9e5e61bb9e48b1de73}System32catroot2 catroot2.old - After you have done this, it is time to restart the services you stopped earlier. To do this, type the following commands and press Enter after each one:
net start bits
net start wuauserv
net start appidsvc
net start cryptsvc
Once you have completed the above procedure, restart your computer and check to see if it resolves the error code.
6. Perform a Clean Boot
A conflict between startup programs or services and the update process often leads to the Windows Update error. When this occurs, you should perform a clean boot by following these steps:
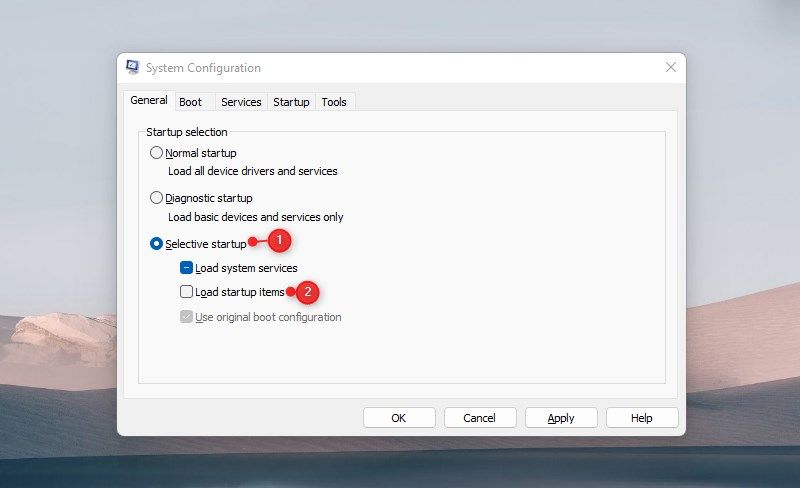
- Open the Run command dialog box.
- Type msconfig in the dialog box and press Enter
- In the System Configuration window, go to the General tab.
- Check the box next to Selective startup.
- Remove the checkmark from Load startup items.
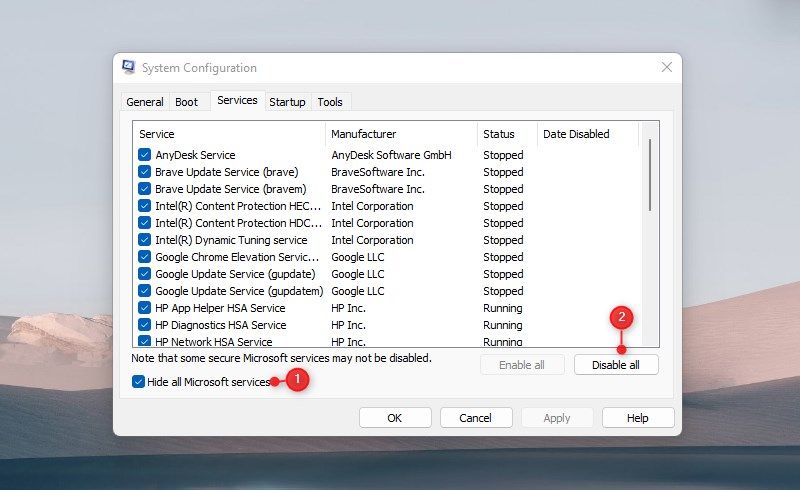
- Switch to the Services tab.
- Check the Hide all Microsoft services box, then click Disable all.
- Click the Apply button to save the changes.
- Click Open Task Manager on the Startup tab.
- When on the Startup tab, right-click on each service and disable them.
- In the System Configuration window, click OK to save your changes.
After you complete the above steps, restart your computer and try updating Windows to the latest version. If this method solves your problem, it indicates that one of the services you disabled was the actual problem. In this case, you should enable each service one at a time and check which one is causing the error.
Get Windows Update Without Problems
It is common to encounter Windows Update errors when updating your operating system to the latest version. Fortunately, the above information will help you resolve such issues on your Windows deviHowever, in. In case none of the above steps helped you fix the problem, it’s time to reset your Windows computer.